Previous: Advanced model animation. Bones
The bone collector.
Yes, this workshop is written for you, the bone collector. You aren't a regular person; you want to become a master in 3DGS' programming, so you want to know even more about bone animations. We will discuss about "ent_bonerotate" and "pose" - these are two important features when it comes to bones.
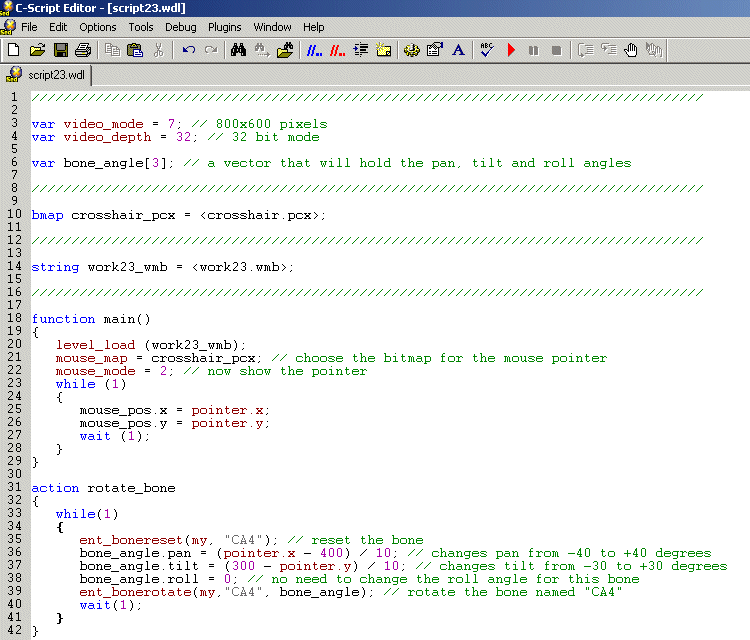
Start SED and open the script23.wdl file:

Function main() loads the level, sets the bitmap for the mouse pointer and makes it visible. The "while (1)" loop updates the position of the pointer every frame; if you have studied the 14th workshop you are really bored as I explain this piece of code.
Let's examine the new bone action:
action rotate_bone
{
while(1)
{
ent_bonereset(my, "CA4");
bone_angle.pan = (pointer.x - 400) / 10;
bone_angle.tilt = (300 - pointer.y) / 10;
bone_angle.roll = 0;
ent_bonerotate(my,"CA4", bone_angle);
wait(1);
}
}
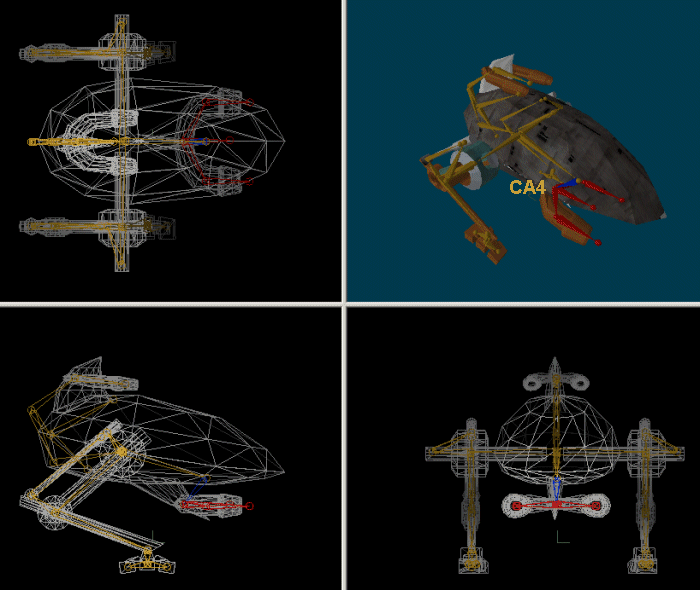
The first line of code inside the "while (1)" loop resets the bone to its default scale and orientation (angles). Here's the default position of the "CA4" bone for our robot.mdl in Med:
And here's the general form of the ent_bonereset instruction:
ent_bonereset (entity, bone_name);
I have used "my" for the entity, so I'll be applying this instruction to the entity that has the action attached to it; bone_name is "CA4" - I have got this name from Med. We need to use this instruction (resetting the "CA4" bone every frame) if we want to compute new angles for the bone each and every frame. We'll get back to this instruction right away.
bone_angle.pan
= (pointer.x - 400) / 10;
bone_angle.tilt = (300 - pointer.y) / 10;
bone_angle.roll = 0;
These 3 lines compute the angles that are needed for the rotation of the bone. I have defined a vector named bone_angle[3] that stores the 3 angles, so let's see how they are computed.
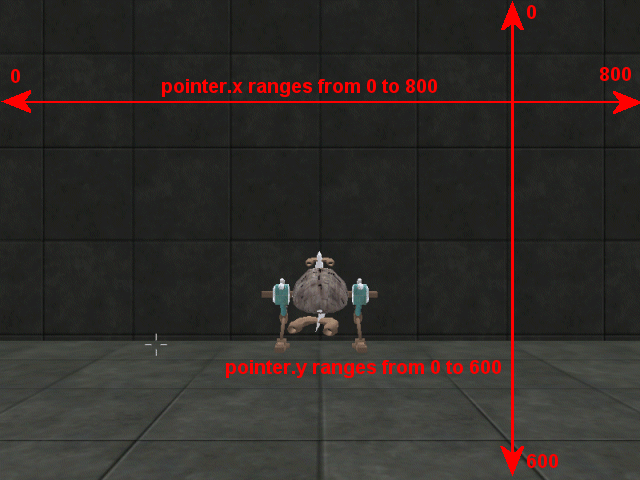
We have set the video resolution for this demo to 800 x 600 pixels, so pointer.x has a value between 0 (left side of the screen) and 800 (right side of the screen). Our formula subtracts 400 from pointer.x, which sets a value that ranges from -400 to 400, and then it divides the result by 10. This means that our robot can change its pan angle from -40 to +40 degrees if we move the mouse along the x axis of the screen.
The formula that computes the tilt angle is a bit different because the y coordinate is reverted (see the picture above) so we must subtract pointer.x from 300 in order to get a value that ranges from -300 (bottom of the screen) to +300 (top of the screen). The result is divided by 10, so the tilt angle will range from -30 to +30 degrees if the player moves the mouse along the y axis.
I chose pan = -40...+40 and tilt = -30... +30 degrees for the two angles, but you can set any other ranges by playing with "10". Aren't you really curious to see the robot in action? Run the script file and you will see it following the position of the mouse pointer with its guns. I won't show you another picture - you've got one right above.
Let's assume that bone_angle.pan = 30 and bone_angle.tilt = 10 at a certain moment. Now let's assume that the player moves the mouse until bone_angle.pan = 35 and bone_angle.tilt = 15. The robot would change its pan to 30 + 35 = 65 degrees and its tilt to 10 + 15 = 25 degrees IF we wouldn't use that "ent_bonereset" instruction inside the "while(1)" loop. By using "ent_bonereset" we get rid of the old angles every frame, so the bone will only get the newly computed angles (pan = 35 degrees and tilt = 15 degrees in my example).
The last line of code is trivial:
ent_bonerotate(my,"CA4", bone_angle);
Take a look at the general form of the instruction:
ent_bonerotate(entity, bone_name, rotation_angle);
- "entity" is the name of the entity;
- "bone_name" is the name of the bone that will be rotated;
- "rotation_angle" is a vector that contains the Euler (pan, tilt, roll) angles.
Now that you know how to work with ent_bonerotate, you can imagine that it can be extremely useful for your projects: your enemies will know how to point their guns at you, your ninja warriors will move and rotate their bodies when they are hit, and so on.
![]()
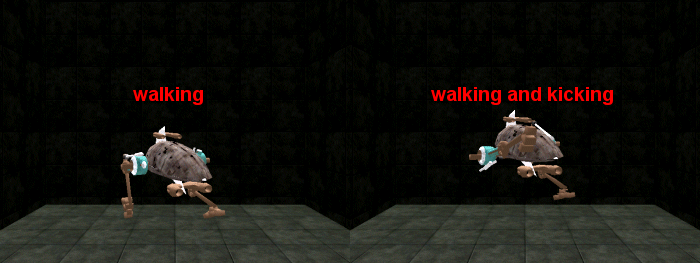
Let's discuss about poses now. A pose is a state that describes the position and the angles of the bones for a certain entity. Any model can have up to 4 different poses; this means that up to 4 different bone animations can be blended at the same time, like running + shooting + turning head + throwing a grenade. We have to use poses if we want to blend two or more animations that change the same bones. We are going to blend 2 animations in the following demo: walking and kicking.
Start WED, open work23_2.wmp, build it and run it. You will see another version of our walking robot; it includes the "walk" and "kick" animations. Press the "K" (kick) key on your keyboard and you will see that the robot uses its right foot for kicking, but keeps walking at the same time. Release "K" and the robot will revert to plain walking.
Let's see the content of the script file now:
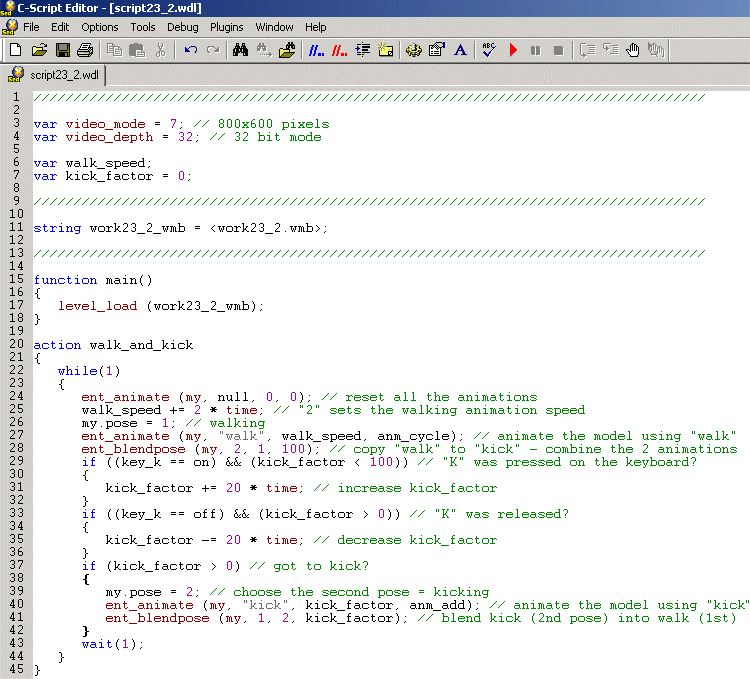
Fear not, for the difference between this action and the "bone_test" action from the 22nd workshop consists of only 4 lines of code. We'll discuss the entire action again briefly; this way you (lazy boy) won't have to read the previous workshop one more time.
action walk_and_kick
{
while(1)
{
ent_animate (my, null, 0, 0);
walk_speed += 2 * time_step;
my.pose = 1;
ent_animate (my, "walk",
walk_speed,
anm_cycle);
The first "ent_animate" instruction resets all the bones for our model, restoring their original positions; the second line increases walk_speed, a variable that controls the walking speed (play with "2" if you want to change the speed). The third line of code sets the first pose of the model (my.pose = 1); this means that following "ent_animate" line of code will build the first pose for our model, which would be "walk" in our script. As a conclusion, the robot will use a walking animation for its first pose.
ent_blendpose (my, 2, 1, 100);
The first "ent_blendpose" line copies the "walk" animation (1 = 1st pose) to "kick" (2 = 2nd pose) because "kick" takes the control when we press "K" (we'll see why this happens really soon). And we want to allow the robot to continue to walk even if it uses its leg for kicking, right? Let's see how the general form of "ent_blendpose" looks like:
ent_blendpose(entity, target_pose, source_pose, blending_factor);
- "entity" is the name of the entity that will be animated. You don't have to use "my" here if you don't want to; any (previously defined) pointer name will work just fine;
- "target_pose" is the pose number that will store the resulting animation. I chose"2" here, which will be used for "kick" as you will soon discover;
- "source_pose" is the pose number that will be used as the source for the animation. I have used "1" here, which is the pose number (set through " my.pose = 1;") for walking;
- "blending_factor" is the percentage (0...100) that sets the amount of blending for the two poses (source and target). If we use "0" here, "target_pose" will remain unchanged, but if we will use "100" (as I did in my example), "source_pose" will be copied (completely blended) to "target_pose".
But what's with this blending? You might ask this question, and I wouldn't hold that against you. Whenever we want to blend two or more animations, the engine uses a combination of the two (or more) poses; bigger "blending_factor" values will give a bigger importance to the "source_pose" animation over the "target_pose" animation. Let's get back to our action:
if
((key_k == on) && (kick_factor < 100))
{
kick_factor +=
20 * time_step;
}
if ((key_k == off) && (kick_factor > 0))
{
kick_factor
-= 20 * time_step;
}
The lines above increase kick_factor (up to 100) if we press and hold the "K" key, and decrease kick_factor down to zero if we release "K". Play with "20" if you want to adjust the kicking speed; of course that you will want to consider pressing "K" when the proper leg is in the right position for kicking.
if (kick_factor > 0)
{
my.pose = 2;
ent_animate (my, "kick", kick_factor, anm_add);
ent_blendpose (my, 1,
2, kick_factor);
}
wait(1);
}
}
If kick_factor is bigger than zero, we need to use the "kick" animation; we set the second pose for our model, because the following "ent_animate" instruction will build the second animation pose for our robot ("kick"). We are using the "anm_add" parameter, which adds the new bone angles to the old ones, rather than completely replacing the older bone angles. This means that the robot will continue to walk even if we make it kick by pressing the "K" key.
The last "ent_blendpose" instruction blends the two animations nicely because kick_factor, which is set as "blending_factor" here, increases and decreases its values smoothly (see the picture in the 22nd workshop). By blending the second pose ("kick") into the first pose ("walk") we can be sure that our models won't show sudden changes (but smooth animation) when combining their existing bone animations.
If you thought that the animation blending was too choppy in the previous workshop, you'll like the smooth blending that is achieved using ent_blendpose.
Next: Global variables. Local variables