Ok, so now we know how to create panels... what comes next? Let's play with digits, a panel element that can display numerical values. Start SED and open the file named script05 in workshop05:
////////////////////////////////////////////////////////////////////
PANEL first_pan
{
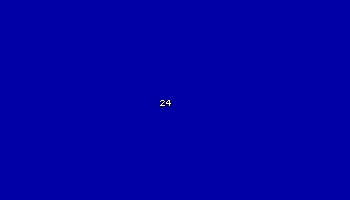
digits (410, 200, 2, _a4font, 1, sys_seconds);
flags = VISIBLE;
}
/////////////////////////////////////////////////////////////////////
I like short examples, but I see something strange here: I thought that a panel definition must include a bmap = some_bitmap; line, and a pos_x and pos_y position! Well... if you don't need a picture for your panel you don't need to add that line of code. And if the position is omitted, it is assumed to be 0. We will only display some figures here - we don't need a bitmap for that.
I see that the "digits" definition doesn't look that complicated. Let's discuss this line of code:
digits (410, 200, 2, _a4font, 1, sys_seconds);
- "digits" is the keyword that must be used whenever we want to display a figure on the screen;
- the first two numbers (x = 410 and y = 200) show the position of the digit on the panel. If the panel would have pos_x = 20 and pos_y = 30 and this digit definition has x = 410 and y = 200 we would see the figure on the screen at x = 430 and y = 230, get it?
- 2 is a format code. In this case it's just the number of digits that will be used to display our number. In my digits example I can display numbers up to 99 (2 digits), but if I would replace 2 with 5 I would set the limit to 99,999. There are more complicated format codes that give the number of decimals or allow to add text (like in our workshop02 example); you can learn everything about them in the reference manual.
- _a4font is an internal font, a small set of characters that will be used to display figures for testing purposes. We can define and use any other fancy fonts, but this one is built inside the engine so we don't have to write its definition;
- 1 is a factor that multiplies the value that needs to be displayed. Don't worry about it for now; we will use 1 here most (if not all) of the time;
- finally, sys_seconds is the name of the variable that will be displayed. You can replace it with any other variable.
Ok, now that we have talked about all these things, we can write down a more general digit definition:
digits (x, y, format, font, factor, variable);
(Tip: in old scripts you'll find that often written differently, like "digits = x, y, format, font, factor, variable;". Unlike in most other cases, the engine here accepts different writing styles that result from the ancient history of Acknex).
Let's Test run this script file:
I can see my digit on the screen and its value changes every second, just like a clock! I'm sure that "sys_seconds" is a predefined variable, just like video_mode, because I didn't have to write its definition at all. You can play with "90" and "200" to change the position of the digit on the screen. If you would change pos_x and pos_y too, you would see that the panel changes its position but the digit keeps its position on the panel.
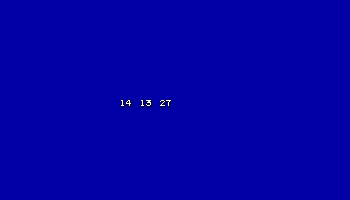
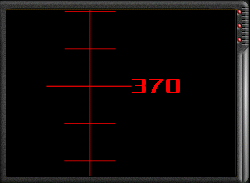
These digits are cool! I could use them to display player's health, armor, number of bullets, lives... every time I need to display a value I will use a digit! But wait... how do I display several digits? Simply add several "digits" to your panel definition:
digits (370, 200, 2, _a4font, 1, sys_hours);
digits (390, 200, 2, _a4font, 1, sys_minutes);
digits (410, 200, 2, _a4font, 1, sys_seconds);
If you are as bold as you should be, replace the single "digits" line in script05 with the 3 lines above to get a simple (yet fully flavoured) clock:
No, I'm not talking about the operating system here; I want to show you how to create a window, a panel element that uses a variable in order to display a certain part of a bitmap. If you aren't so sure that this "window" is useful, trust me: it is. You will want to use windows whenever you want to create a compass or maybe a (horizontal or vertical) bar that changes its length or width, for example some health bars for your fighting game:
Let me show you how these windows work and then you will be able to decide when and why you would want to use them.
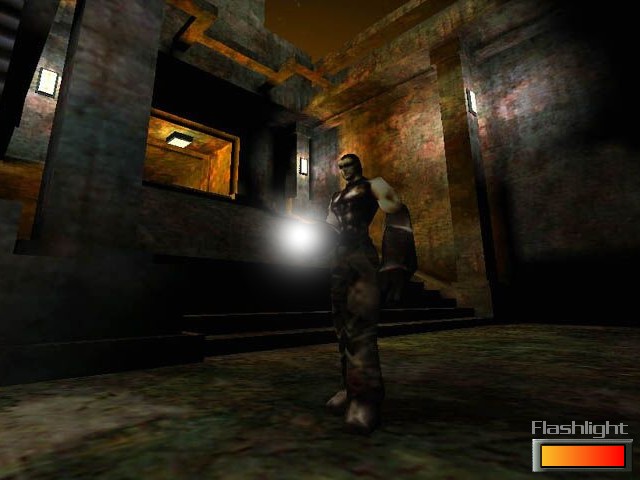
Let's imagine that we want to use a flashlight in our game. We'd like to have an indicator for the batteries: when they are full of energy, we would like to display a small green picture on the screen. When the batteries start to run out of energy, we'd like to have a yellow picture and when the batteries are dead we'd like to see a red picture.
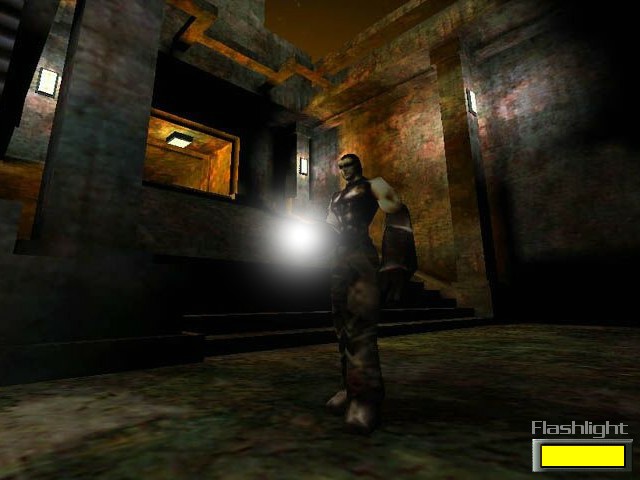
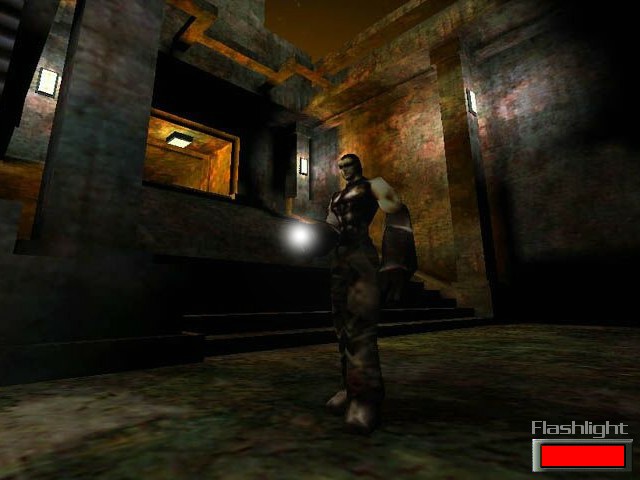
Of course that the flashlight indicator would look even better if the transitions from one color to another would be smoother...
Don't worry, all this stuff can be created using a simple "window" definition. First we create a long bitmap that looks like this:
![]()
Next we use a window definition that makes this bitmap slide along the small frame, like in the picture below:
![]()
The parts of the bitmap that are placed outside the frame are (you've guessed) invisible, so the player can only see the picture inside the frame. You simply change a variable that moves the bitmap to the left or to the right using a "window" definition.
Now that you've grasped the basics, let's create an altitude meter (altimeter) for our plane:
It is pretty clear that we need a bitmap that looks like this:
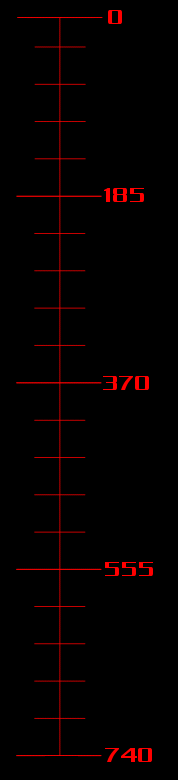
We want to display only a part of the bitmap, the one that corresponds to a certain altitude for our plane. How do we do that?
We have to define a window: edit the code in script05.wdl until it looks like the one posted below (hint: copy and paste the lines into your script05 file).
////////////////////////////////////////////////////////////////////
var video_mode = 7;
var screen_color[3] = 150,0,0;

////////////////////////////////////////////////////////////////////
var altitude = 0; // height of the plane

PANEL first_pan
{
   bmap = "frame.pcx";
   window (40, 10, 178, 160, "height.pcx", 0, altitude);
   flags = VISIBLE;
}

/////////////////////////////////////////////////////////////////////
Let's see the changes: we have a new var named altitude and are using two bitmaps in the panel; one of them is used as a frame for the altimeter (we don't really "need" it, but it looks cool) and the other one is used inside the window definition. And of course, we have the windowdefinition inside the panel named first_pan!
Time to run our script! Press Test run and you will see the following image:
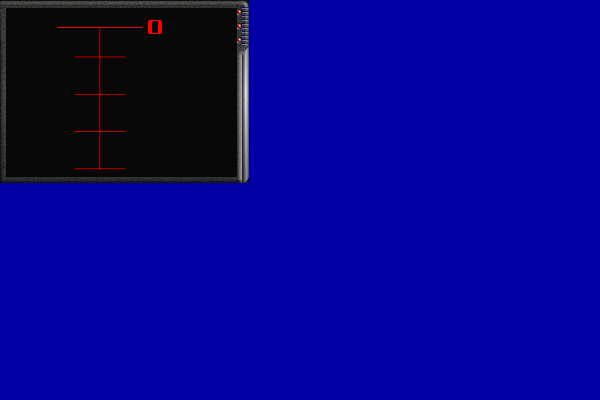
Press Tab on your keyboard to show the console and then type the following line of code and press Enter:
altitude = 150;
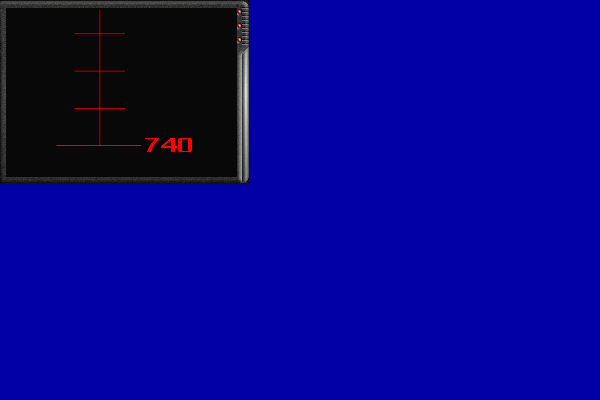
You can see that the bitmap has changed and we are coming close to 185 feet / miles / whatever. You can type any other values but you will notice that big values like this:
altitude = 1000;
won't be displayed correctly; this happens because the bitmap used for the window has a height of only 780 pixels. Use smaller variable ranges or bigger bitmaps if you need to.
Let's see a typical window picture and its definition step by step:
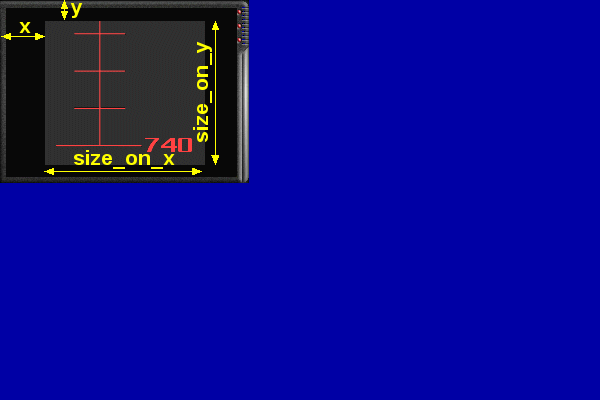
window (x, y, size_x, size_y, bitmap, variable_x, variable_y);
- window is the keyword that must be used every time we define a window;
- x and y give the position of the window on the panel. If the panel has pos_x = 200 and pos_y = 100 and our window has x = 30 and y = 20, the bitmap used for the window will be placed at x = 230 and y = 120 on the screen.
- size_x and size_y give the size of the cutout "window" on x and y. Remember that the window bitmap itself is huge; these figures will set the size of the visible part of the bitmap on x and y;
- bitmap is the name of a previously defined BMAP, or the file name of the bitmap used for the window (height_pcx);
- variable_x gives the horizontal offset of the bitmap used for window. We don't want to move the red bitmap to the left or to the right so we use zero here;
- variable_y gives the vertical offset of the bitmap used for the window. We want to move the red bitmap up and down so we have put a variable here (altitude).
Conclusion: When you create a window, you will see only a small part of the bitmap used for it. Change variable_x or variable_y (altitude in our script) and the long bitmap will be shifted along the x or y axis, displaying other parts of the bitmap on the screen. The size of the cutout window (what you see) is given by size_x and size_y.