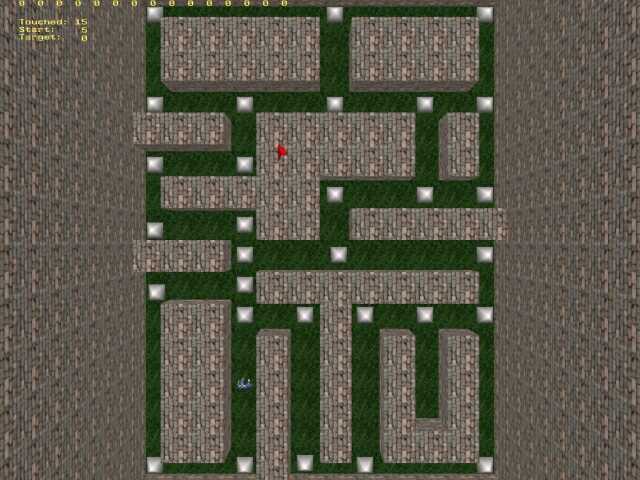
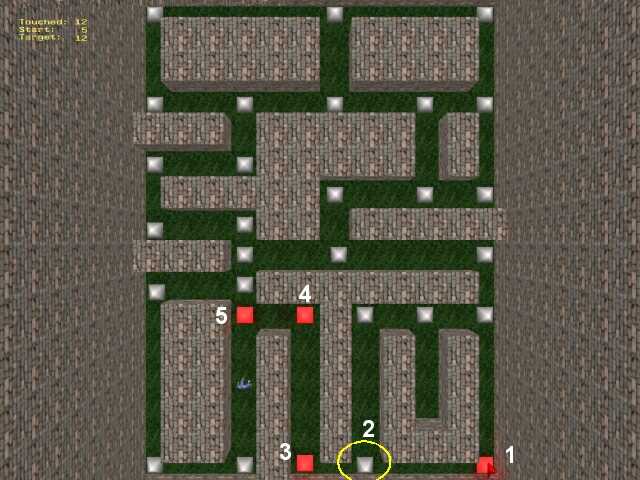
Last month I have started to write the code for Perfect AI, the one that chooses the shortest path from a starting point (the enemy) to the destination (the player). This month you will see the algorithm in action: open level2.wmp, build it and run it:
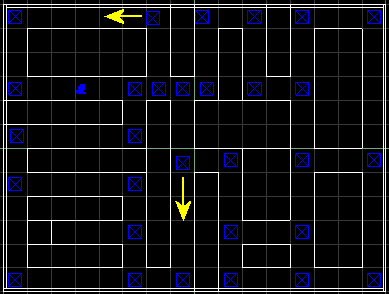
The screen displays "Touched" (the last node that was touched by the mouse), "Start" (starting node) and "Target" (destination node). Now move the mouse over node 27 and click it; you will see that the nodes that describe the shortest path from this node to the player will change their color from white to red, like in the picture below:
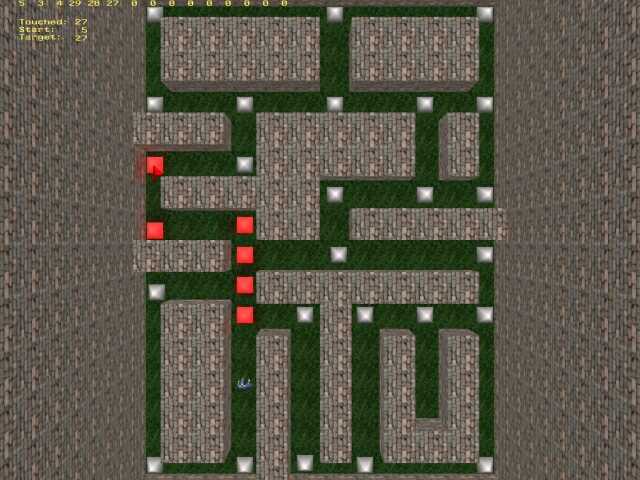
You can move the player anywhere; the target node will be the closest node to the player that can see the player. You can click any node in the level and you will get the shortest path to the player every time. The numbers of the nodes that describe the shortest path appear on top of the screen. It is clear that the enemy will hunt down the player like a dog even if my example level looks like a complicated maze.
I heard many stories about how hard it is to write good AI code because the speed of the game will decrease a lot, etc. I am happy to tell you that Perfect AI runs really fast; the shortest path is computed in less than a frame every time. I have used a Floyd - Dijkstra - George :) algorithm because it is simple to implement and it works extremely fast.
I advise you to read the article in Aum27; I won't explain what I did there again.
function
main()
{
mouse_range = 5000;
fps_max = 60;
clip_size = 0;
level_load(level2_wmb);
wait (3);
camera.z = 2400;
camera.tilt = -90;
init_mouse();
while (distances_computed == 0) {wait (1);}
run_algorithm();
We are using the mouse to "touch" the nodes; move the mouse over a specific node and you will see its number on the screen. The first line of code makes sure that we can touch any node even if it is placed up to 5000 quants away. We limit the frame rate to 60 fps, we show all the triangles for all the models, we load the level and then we set a convenient camera position and tilt angle. The function named init_mouse is your typical mouse function; I will list its code in a moment. I chose to compute the distance between the nodes that can see each other directly (not the shortest distance nor the actual path!) at game start so the algorithm will not run until distance_computed is set to 1 by another action.
while (1)
{
index %= max_nodes;
if ((node_to_player[index] < closest_distance) && (see_player[index]
== 1))
{
closest_distance = node_to_player[index];
target_node = index;
}
else
{
closest_distance = node_to_player[target_node];
}
index += 1;
wait (1);
}
}
The rest of the code check which one of the nodes (0...29) is the closest node to the player that can see the player. This will be the target node, the goal for our enemy. Read the article in Aum27 for a through explanation.
action
player1
{
player = me;
while (1)
{
my.pan += 4 * (key_cul - key_cur) * time;
my.skill1 = 15 * (key_cuu - key_cud) * time;
if (key_cuu + key_cud > 0)
{
ent_cycle("walk", my.skill46);
my.skill46 += 10 * time;
my.skill46 %= 100;
}
else
{
ent_cycle("idle", my.skill46);
my.skill46 += 2 * time;
my.skill46 %= 100;
}
move_mode = ignore_passable + glide;
ent_move(my.skill1, nullvector);
wait (1);
}
}
I haven't changed the action attached to the player model; ok, I have increased its speed and I got rid of the var named player_speed (I'm using some skills now) but the rest of the code is just like the one used in Aum27.
Let me show you the arrays used for this demo:
var
node_to_player[30];
var
see_player[30];
var
nodex[30];
var
nodey[30];
var
node_to_node[900];
var
visited[900];
var
path[30];
Node_to_player will store the distance from every node to the player; see_player will be set to 1 if that node can "see" the player and to 0 if the node can't see the player. Nodex and nodey store the x and y coordinates for the 30 nodes; these values will be used by the enemy to navigate from one node to another. Node_to_node stores the distance between any two nodes and acts like a matrix of 30x30 elements. Visited stores the path from a node to any other node and path stores the real path from start to target. Don't be afraid, we will use many pictures along the way.
Prepare for action!
action
node
{
my.enable_scan = on;
my.enable_touch = on;
my.enable_click = on;
my.event = trace_back;
my.skill47 = 1234;
my.passable = on;
Every
node is sensitive to scan, touch and click; if one of these events take
place, the node will run its associated trace_back function. Skill47 was
set to a weird value (for future use) and the node was made passable.
number_of_nodes += 1;
my.skill48 = number_of_nodes;
nodex[my.skill48] = my.x;
nodey[my.skill48] = my.y;
while (number_of_nodes < (max_nodes - 1)) {wait (1);}
Every node must get an ID number (0...29); the nodes appear in the level in a random order so number_of_nodes = 0 for the first node, number_of_nodes = 1 for the second node, etc because number_of_nodes = -1 at game start. Every node stores its ID number in its own skill48; the coordinates (x and y) for the node are stored in nodex and nodey. We wait until all the nodes are placed in the level.
while (current_node <= number_of_nodes)
{
if (current_node == my.skill48)
{
temp.x = 360;
temp.y = 30;
temp.z = 1000;
scan_entity (my.x, temp);
current_node += 1;
}
wait (1);
}
distances_computed = 1;
The first node (0) will scan for the nodes nearby; if its scan finds some nodes it will trigger their events. The scanning takes place in all the directions horizontally (360 degrees) and up to 1000 quants. We wait for a frame and then the second node (1) will do the same thing, etc. This way we don't have 30 scan_entity instructions running at the same time so the frame rate will remain big even on weak PCs. As soon as all the nodes have scanned their neighbors we set distances_computed to 1, allowing the run_algorithm function in main to... run. We'll take about that function a little later.
while (player == null) {wait (1);}
while (1)
{
node_to_player[my.skill48] = vec_dist(player.x, my.x);
if (node_to_player[my.skill48] < 500)
{
trace_mode = ignore_me + ignore_models + ignore_passents;
if (trace (my.pos, player.pos) == 0)
{
see_player[my.skill48] = 1;
}
else
{
see_player[my.skill48] = 0;
}
}
sleep (0.1);
}
}
We wait until the player is created and then we store the distance from every node to the player in node_to_player. If the player has come closer than 500 quants to the node, the node will trace the player, setting see_player = 1 if the node can see the player and see_player = 0 if the node can't see the player. The nodes trace 10 times a second; that's the only part of the Perfect AI that uses precious computer resources. Please note that only the nodes that are close to the player try to trace it so if six nodes can see the player we are using (in theory) less than a trace every frame and this is very good for us!
That's the code used for the nodes and it doesn't look too complicated. Before I move on, let me show you how these nodes work together:
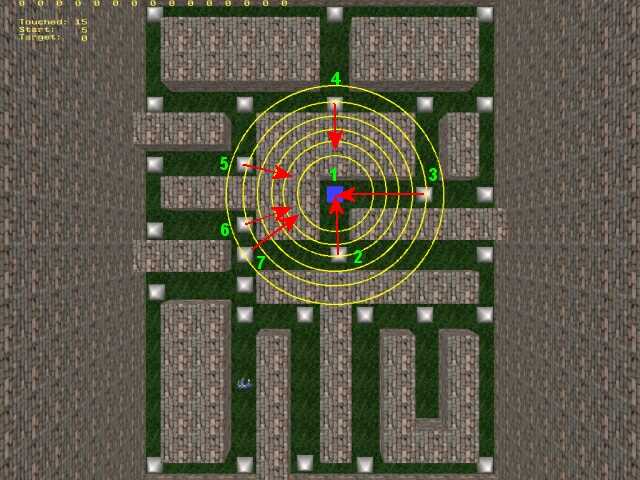
Node 1 scans on a radius of 1000 quants; it detects nodes 2, 3, 4, 5, 6, 7. All these nodes will trace back to node 1; you can see that 2 and 3 are able to see 1 (the node that scanned them) but the rest of the nodes can't see it. The process repeats for all the nodes.
Let's see the event function associated to the nodes:
function
trace_back()
{
if (event_type == event_scan)
{
my.skill45 = handle(you);
trace_mode = ignore_me + ignore_models + ignore_passents;
if (trace (my.x, you.x) == 0)
{
you = ptr_for_handle(my.skill45);
index = you.skill48 + my.skill48 * max_nodes;
node_to_node[index] = vec_dist(my.x, you.x);
}
}
if (event_type == event_touch)
{
touched_node = my.skill48;
}
if (event_type == event_click)
{
start_node = my.skill48;
}
}
If the node is scanned it will store the "you" entity in skill45. Who is "you"? It's the node that has scanned this node, triggering its event (node 1 in the picture above). Any trace instruction would destroy the "you" pointer so we store it in skill45. If the node can "see" the node that scanned it, we restore the "you" pointer and we store the distance between "my" (the node that was scanned) and "you" (the node that has scanned) in node_to_node. I use "index" as an index inside the array that creates the virtual matrix.
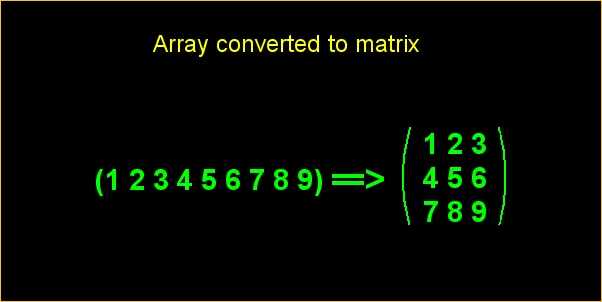
Node_to_node has 900 elements so you should see it as a matrix that has 30 lines and 30 columns.
Let's get back to the event function; if the node is touched by the mouse, touched_node (one of the vars that are displayed on the screen) is set to the value stored in skill40 for that node, which is the number of that node. This way we can move the mouse pointer over a node and we will see its number. Finally, if the node is clicked with the left mouse button, start_node, the first point on the shortest path, is set to the number of that node.
Here's an easy function, the one that deals with the mouse movement:
function
init_mouse()
{
mouse_map = pointer_pcx;
mouse_mode = 2;
while (1)
{
if (mouse_left == 1) {display_path();}
mouse_pos.x = pointer.x;
mouse_pos.y = pointer.y;
wait (1);
}
}
The only thing that must be mentioned here is that the same left click runs display_path, the function that displays the shortest path between start_node and target_node.
Ok,
let's stop for a moment. We have some nodes scanning each other, tracing
back... it looks like we have we processed a lot of data but how does it
look like?
That's
an excellent question! :)
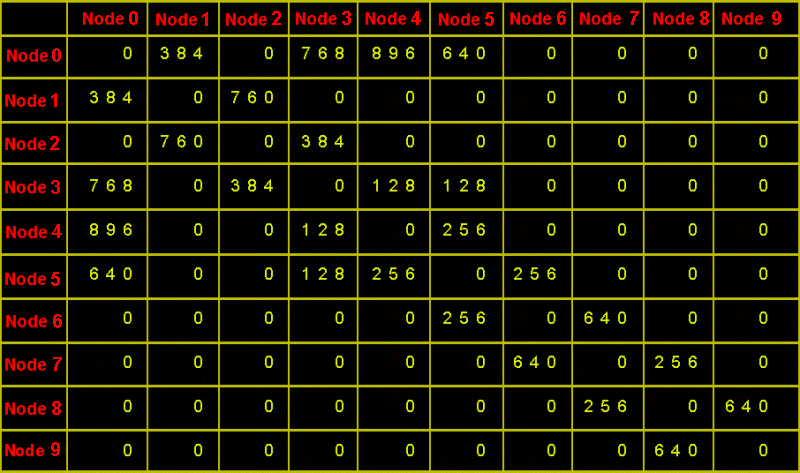
That's how node_to_node looks for the first 10 nodes; node 0 and 1 can see each other and the distance between them is 384 quants, node 2 and 4 can't see each other (the distance between them is zero), etc. Please be aware that the nodes will get different numbers when you run the demo level so take this table as a simple example.
Time to face the most horrible function you've ever seen:
function
run_algorithm()
{
i = 0;
j = 0;
while (i < max_nodes)
{
while (j < max_nodes)
{
index = j + i * max_nodes;
if (node_to_node[index] == 0)
{
node_to_node[index] = 999999;
}
j += 1;
}
i += 1;
j = 0;
}
I took a good look at the code and it doesn't look that frightening! I have used several vars with short names (i, j, k, l) to make the code more readable. The piece of code above computes the correct index for the array and replaces all the zeros with 999,999. Do you remember the previous table? If two nodes couldn't see each other the distance between them was zero. We want to compute the shortest path between any two nodes so if they can't see each other we'd better set a huge distance between them. The table should look like this now:
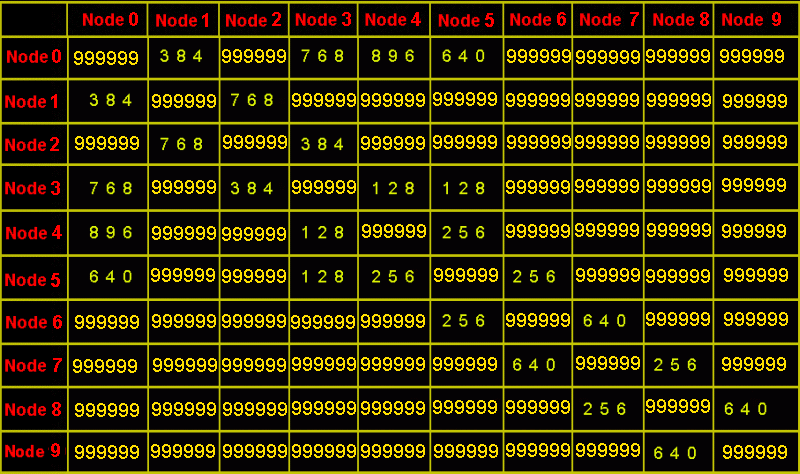
Ok, so if a node can see other node I can see its distance to that node in the table; if it can't see the other node the distance between them is 999,999. Time to compute the distance between any two nodes, even if they can't see each other:
i = 0;
j = 0;
k = 0;
while (i < max_nodes)
{
while (j < max_nodes)
{
while (k < max_nodes)
{
if (node_to_node[j + i * max_nodes] + node_to_node[i + k * max_nodes])
< (node_to_node[j + k * max_nodes])
{
node_to_node[j + k * max_nodes] = node_to_node[j + i * max_nodes] + node_to_node[i
+ k * max_nodes];
visited[j + k * max_nodes] = i;
}
I'm going to use a numerical example to make the things easier for you. We go through all the nodes and if distance(2, 10) + distance(10, 15) < distance(2, 15) then 10 is a node on a shorter path, so we make the change: we will not use the older, longer route from now on. We also store the newly visited node (10 in my example).
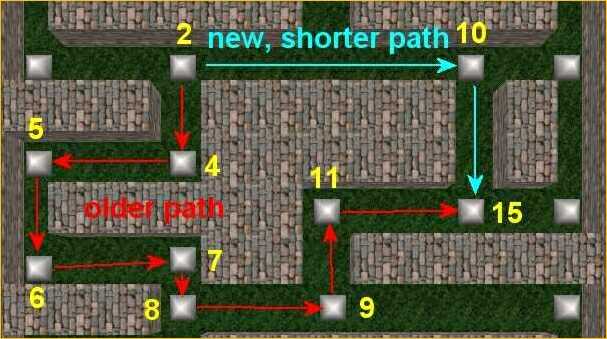
Take a look at the picture above: node 2 knew that the shortest path to node 15 was through 4, 5, 6, 7, 8, 9 and 11 but now it has learned that there is a shorter path through node 10. The process repeats for all the nodes.
if (j == k)
{
node_to_node[j + k * max_nodes] = 0;
visited[j + k * max_nodes] = 0;
}
k += 1;
}
k = 0;
j += 1;
}
k = 0;
j = 0;
i += 1;
}
}
When j = k we set the distance between j and k: distance(0, 0).... distance (29, 29) to zero. A node should be zero quants away from itself, isn't it? We do the same thing with the visited node. Those vars are incremented, initialized, etc to make sure that the three neste while loops continue to run passing through all the elements of node_to_node. You are interested in seeing a new node_to_node table, arent't you?
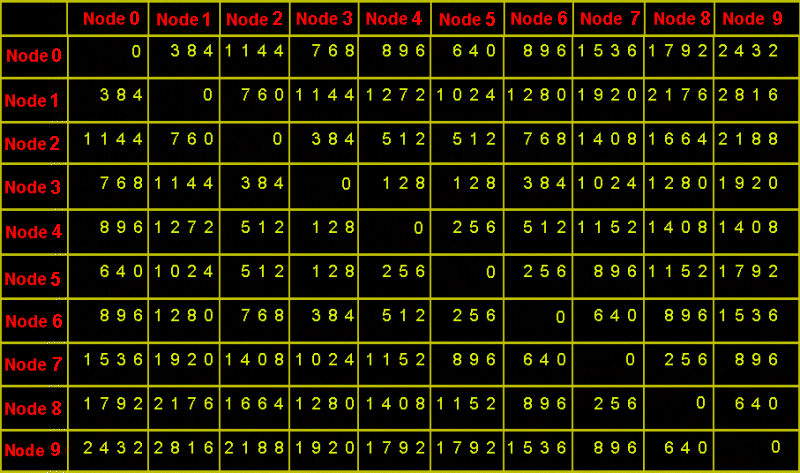
That's a lovely table! I can see the shortest distance between any two nodes, even if they can't see each other! The distance between node 2 and node 6 is 768 quants and so on. Now we need to compute the actual path (we don't know it yet) and we are ready to go!
Do you remember the tiny function used for the mouse movement? When you click the left mouse button you run this function - function display_path:
function
display_path()
{
proc_kill(4);
while (mouse_left == 1) {wait (1);}
k = 0;
while (k < 30)
{
path[k] = 0;
k += 1;
}
Only one instance of this function should be running; we wait for the left mouse button to be released and then we reset the array that holds the actual path, named... path. We do that because a part of an older, longer path would continue to be stored inside the path array:
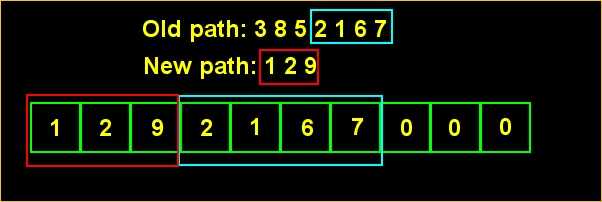
k = 0;
path[k] = target_node;
find_path(start_node, target_node);
sleep (1);
i = k;
while (i >= 0)
{
temp.x = nodex[path[i]];
temp.y = nodey[path[i]];
temp.z = 50;
ent_create (marker_mdl, temp, dynamic_light);
i -= 1;
sleep (0.5); // every 0.5 seconds
}
}
We write the first path element (target_node) and then we run the function that finds the shortest path between start_node and target_node. That function is extremely fast so you don't need to wait for a second; wait (1) would work ok too. I chose to wait for a second because I'm going to use a few dynamic lights and I want you to see them in their full splendor. The var named k stores the number of nodes on the shortest path; we will see how it does that in a second. As long as we haven't created all the lights that describe the shortest path between start_node and target_node, we get the previously store coordinates of the proper nodes from nodex and nodey and we create invisible entities that generate red light about 50 quants above the ground level. This way we don't have to interact with the nodes but we will make them look reddish.
These red lights are created every 0.5 seconds and their associated function has its code listed below:
function
dynamic_light()
{
my.invisible
= on;
my.passable
= on;
my.lightrange
= 100;
my.lightred
= 255;
my.lightgreen
= 0;
my.lightblue
= 0;
sleep
(3);
ent_remove(me);
}
I have used the same marker model for these red light entities but it is made invisible and passable so who cares about it? The red lights will exist for 3 seconds and then they will be removed; this way we can have up to 6-7 lights glowing on our path at the same time.
Feeling tired? Me too. There's only one function left to be discussed:
function
find_path(l, j)
{
i = 0;
while (i < max_nodes)
{
if ((i != j) && (visited[i + max_nodes * j] == 0))
{
if (node_to_node[l + max_nodes * j] == node_to_node[l + max_nodes * i]
+ node_to_node[i + max_nodes * j])
{
k += 1;
path[k] = i;
next_node = i;
i = max_nodes - 1;
if (path[k] == l)
{
return;
}
}
}
i += 1;
}
j = next_node;
find_path(l, j);
}
This function writes the actual path inside the "path" array. Let's see how it was called from function display_path:
find_path(start_node, target_node);
This means that if I run find_path(14, 5) the function will find nodes that create the shortest path between 14 and 5, for example: 14 2 7 19 5. Let's see how it does that.
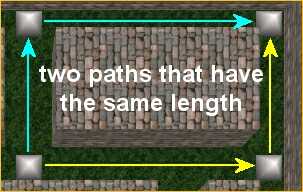
The var named i starts from 0 and we will search from this node (0) the rest of the 29 nodes (max_nodes = 30). If the current node can "see" one of the other nodes (excepting itself, i != j) and if it is a node on the shortest path (because the shortest path includes it) then we have found a new path element; we increment k and we store the new node number inside the "path" array. We copy the new node on the shortest path in next_node because it will loose its value right away; we set i = 29 to get out of the while loop because we want to eliminate other paths that have the same length, like in the picture below:
If path[k] = l we have reached the starting point (l = start_node) so we get out of the function, otherwise we set the next node on the path as target (j = next_node) and the function calls itself again (that's how recursive functions work). If your previous function call has searched the path between nodes 2 and 10, now it will search for the path between 2 and 7, if node 7 is the next node on the shortest path. The process repeats as many times as it is needed and at the end of it the whole path is stored in the array named path.
That
was all! I don't want you to feel too bad if you don't understand how this
code works right away; a good AI system is pretty hard to code, after all.
The last article in this series will teach you how to set up a playable
level without touching a single line of code! Perfect AI was written with
these goals in mind:
-
Extremely friendly setup for the level designer;
-
Simple usage for the programmer.
The AI engine was built so next month we will have fun with a playable level. I'll see you then!
What do you say? You have found a bug in my Perfect AI code?
I see... so you have clicked on node 1 and instead of seeing 1 - 2 - 3 - 4 - 5 on the screen you only got 1 - 3 - 4 - 5! This isn't a bug; node 1 can see node 3 directly so it doesn't need node 2 to create the shortest path to the player. If you like to have more points on the shortest path (why would you want that?) use smaller range scan_entity instructions and place more nodes in your levels.
Final advice: test your paths carefully. I had to move a few of the nodes in my demo level a little because they were seeing each other directly, like in the picture below:
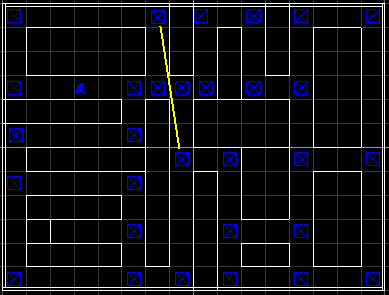
These minor changes don't change the gameplay at all so don't be shy and do the same thing in your levels if you need to.
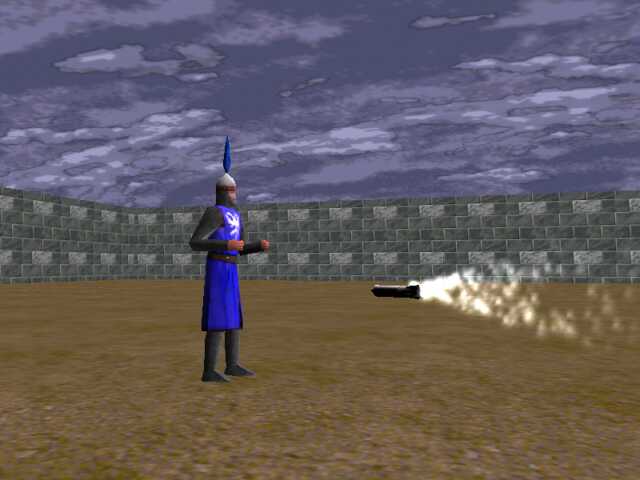
Heat seeking
missiles
This month I have come up with a standalone project that should show you how to add heat seeking missiles to your projects.
Let's start with function main:
function
main()
{
on_d = null;
level_load (heatseek_wmb);
}
There's nothing special here. I have disabled the debug key ("D" for A5) because I will use WSAD to move the player.
action
player_moves
{
player = me;
camera.pan = player.pan;
my.invisible = on;
while (1)
{
vec_set (camera.pos, my.pos);
camera.tilt += 20 * mouse_force.y * time;
camera.pan -= 20 * mouse_force.x * time;
my.pan = camera.pan;
my.tilt = camera.tilt;
player_speed.x = 15 * (key_w - key_s) * time;
player_speed.y = 10 * (key_a - key_d) * time;
vec_set (temp, my.x);
temp.z -= 1000;
trace_mode = ignore_me + use_box;
player_speed.z = -trace (my.x, temp);
move_mode = ignore_you + ignore_passable;
ent_move(player_speed, nullvector);
if (mouse_left == 1)
{
fire_rocket();
}
wait (1);
}
}
The player is made invisible because we are using a first person camera. We can rotate the camera using the mouse and we move using the "W", "S", "A" and "D" keys. We use trace to keep the player with its feet on the ground all the time. If we press the left mouse button (LMB) function fire_rocket is called:
function
fire_rocket()
{
proc_kill(4); // only one instance of this function is running
while (mouse_left == 1) {wait (1);}
ent_create (rocket_mdl, player.pos, shoot_rocket);
snd_play (rocket_wav, 50, 0);
}
Only one instance of the function should run; we wait for the LMB to be released and then we create a rocket and we play a sound. The rocket runs its shoot_rocket function:
function
shoot_rocket()
{
wait (1);
my.enable_entity = on;
my.enable_block = on;
my.event = remove_rocket;
my.pan = camera.pan;
my.tilt = camera.tilt;
my.skill20 = 0;
my.skill1 = 10;
my.skill2 = 0;
my.skill3 = 0;
my.skill1 *= time;
my.skill10 = 0;
The rocket is sensitive to entities and level blocks; its event function is remove_rocket. The rocket has the same pan and tilt angles with the camera at its creation. Skills 1...3 are used as a single var that gives the speed of the rocket.
while (my.skill20 < 500)
{
temp.x = 40; // horizontal scanning angle
temp.y = 60; // vertical scanning angle
temp.z = 500; // scanning range
if ((my.skill10 == 0) && (vec_dist (my.x, player.x) > 100))
{
scan_entity (my.x, temp);
}
my.skill20 += 1 * time;
ent_move (my.skill1, nullvector);
temp.x = my.x - 6 * cos(my.pan);
temp.y = my.y - 6 * sin(my.pan);
temp.z = my.z;
effect (particle_trail, 10, temp, normal);
wait (1);
}
remove_rocket();
}
As long as the rocket continues to exist (skill20 < 500), we set its scanning angles and range: 40 degrees horizontally, 60 degrees vertically and a range of 500 quants. If the distance between the player and the rocket is over 100 quants the rocket will start to scan the environment, looking for entities with their enable_scan flag set. The rocket continues to move all this time and we create a smoke trail effect 6 quants behind the origin of the rocket model.
function
particle_trail()
{
temp.x = random(2) - 1;
temp.y = random(2) - 1;
temp.z = random(2) - 1;
vec_rotate (temp, my.pan);
vec_normalize (temp, 3);
vec_add (my.vel_x, temp);
my.alpha = 40 + random(30);
my.bmap = ptrail_map;
my.size = random(2) + 5;
my.flare = on;
my.bright = on;
// my.beam = on;
my.move = on;
my.lifespan = 20;
my.function = fade_trail;
}
function
fade_trail()
{
my.alpha -= 10 * time;
if (my.alpha < 0) {my.lifespan = 0;}
}
That's a typical particle function, with random speeds in all the directions, variable alpha and size and a simple function that fades out the older particles. Try using my.beam = on if you own A5 pro or A6 pro - it will make the smoke trail more interesting.
Let's see what happens when the rocket hits something:
function
remove_rocket()
{
wait (1);
my.event = null;
ent_playsound (my, destroyed_wav, 1000); // play the explosion sound
my.invisible = on; // hide the rocket, keep ent_playsound playing
sleep (1.5); // wait for 1.5 seconds
ent_remove(me); // now remove it
}
It looks like its event is set to null so the rocket can't react to other events and then it plays an explosion sound. We hide the rocket for 1.5 seconds because we want the explosion sound to continue to play and then we remove the rocket.
Time to take care of our enemies!
action
enemy
{
my.enable_scan = on;
my.event = enemy_event;
}
All these guys need to do is to make sure that they have their enable_scan flag set. As soon as the rocket scans one of them, function enemy_event will start to run:
function
enemy_event()
{
if (event_type == event_scan)
{
you.skill10 = 1; // stop scanning
while (you != null) // as long as the rocket exists
{
vec_set (temp.x, my.x);
vec_sub (temp.x, you.x);
vec_to_angle (you.pan, temp.x);
wait (1);
}
}
}
You.skill10
= 1 will make the rocket to stop scanning in order to preserve those precious
computer resources; take a look at function shoot_rocket if you don't believe
me. As long as the rocket exists (you != null) the rocket will rotate towards
this enemy. My enemies are static but even if they would be moving targets
they wouldn't have any chance if the speed of the rocket would be bigger
than their own movement speed.